You know you eat paleo when your trash can is full of all kinds of fruit and veggie trimmings, egg shells and coffee grounds. These are PERFECT for a compost bin. I’ve always wanted to compost, but have been in apartments and very busy jobs for the past few years. Don’t get me wrong – you can totally do this in your apartment or on your balcony, I just didn’t have the time before. It makes complete sense that paleo people should be composters too! Even if you don’t have a garden to use the compost on, you can share it with neighbors and friends who do have gardens!
I’m sure you know by now I LOVE infographics… like really love. If I could print them all out without breaking the bank on printer ink, I would have a giant wall full of them – mainly in the kitchen! So, I had the fortune of finding an infographic for COMPOSTING. I know. I’m excited too. This one is definitely worth printing out and keeping on the inside of a cabinet. Click here for a more scientific approach to composting.
**Below the infographic is information on how to make your own compost or purchase a pre-made one**
How easy was that? Super simple, and it’s all the things we use (with the exception of fats and meats). Not only will this help you feel like you’re not adding to the local landfill, you’ll be saving money on fertilizer, or gifting it to your loved ones.
How to make a Compost of your own:
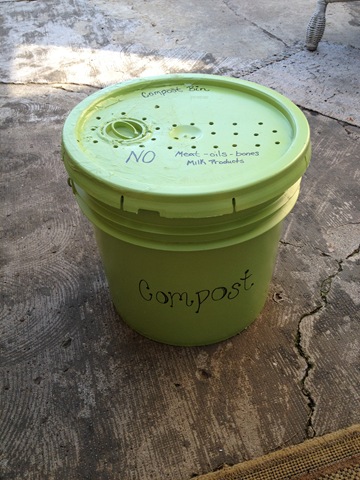
There are several different types of composts you can make, the one that I use I made from a bucket that once contained a bunch of cake frosting that I didn’t eat. I swear. It’s from a cake shop down the road! This is great for apartments and single people or small families as it’s not too large. If you need larger, you can do this with a large plastic trash can, just make sure it has a lid.
Here’s what you need:
- 1 large plastic bucket with tight fitting lid
- Piece of felt (for an indoor / Apartment friendly version)* not necessary if you keep it outdoors.
- Drill
- Adhesive (spray adhesive is super easy!)
- Soil starter, (grass clippings, newspaper strips are good to add now too)
- Leftover Kitchen compostable items
Start by drilling holes in the lid. You need to make sure that air can go in and out of the bucket. I did about 10. For the indoor version: once the holes are drilled, turn the lid over and adhere the felt over the holes to create a filter. Fill with soil, and your compostable food products. Let the magic begin! The bucket is nice because you need to ‘turn the compost’ to make sure its evenly decomposing, this can be done by simply rolling it on it’s side and moving it around a few times. (if you need photo instructions – check out this link!)

Keep up the good work folks!
Image 1: Apartment Therapy Image 2: infographiclist.com Image 3: DIY Compost Bin – Simply Adapting Source: simplyadaptingSOURCE: Paleoblocks – Read entire story here.


